SLS vs SLA: Which 3D Printing Technology Is Right for Your Application in 2026?
The SLS vs SLA debate isn’t about which technology is better. It’s about which one survives your application’s mechanical loads and post-processing realities. Engineers who choose based on machine cost alone end up with parts that fail during assembly or require 40+ hours of manual labor per build.
Your decision hinges on two factors: the stress your part will endure and how much post-processing bandwidth your team actually has. SLS delivers isotropic strength with minimal finishing. SLA offers dimensional accuracy but demands support removal, UV curing, and surface treatment. Choose based on what breaks your workflow, not your budget.
Contents
- 1 The 30-Second Verdict: Quick Decision Matrix
- 2 Material Science: Thermoplastic Powder vs. Photopolymer Resin
- 3 Mechanical Realities: How Parts Perform Under Stress
- 4 Geometric Freedom and Design Constraints
- 5 From Print Bed to Product: The Post-Processing Pipeline
- 6 The Economic Equation: Total Cost of Ownership (TCO)
- 7 Industry-Specific Applications in 2026
- 8 Final Checklist: 5 Questions to Ask Before You Hit “Print”
- 9 FAQs
The 30-Second Verdict: Quick Decision Matrix
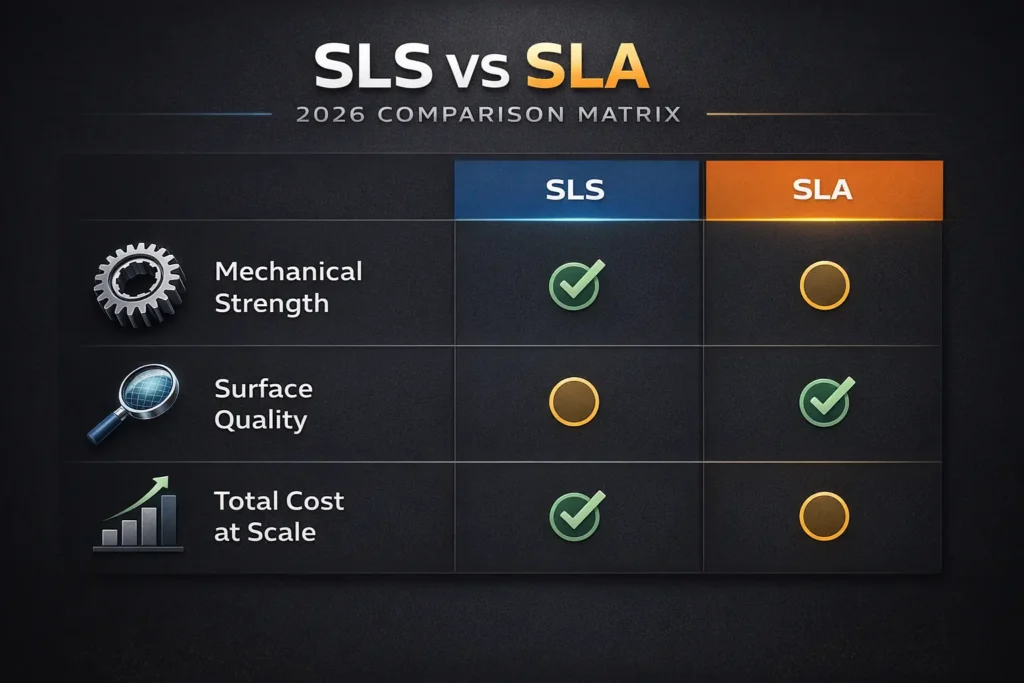
This table cuts through the noise and shows you which technology wins for your specific constraint.
| Feature | SLA | SLS | Winner |
| Surface Finish | 15-50 microns, glossy | 100 microns, matte | SLA |
| Mechanical Strength | Anisotropic, 20-65 MPa tensile | Isotropic, 48-50 MPa tensile | SLS |
| Support Removal | 2-8 hours manual labor | Zero supports needed | SLS |
| Material Cost | $149-$300/kg resin | $80-$120/kg Nylon PA12 | SLS |
| Post-Processing Time | 40+ hours per build | 10 hours (depowdering + bead blast) | SLS |
| UV Stability | Degrades under sunlight | Stable outdoors | SLS |
When to Choose SLA (Visuals & Precision)
- Consumer product prototypes requiring glossy finishes and sub-50 micron detail for client presentations.
- Dental aligners and surgical guides where biocompatible photopolymer resin meets FDA requirements.
- Jewelry masters and casting patterns needing zero draft angles and intricate geometries.
- Low-volume aesthetic housings under 200mm³ that won’t face mechanical stress or UV exposure.
When to Choose SLS (Function & Durability)
- Functional prototypes subjected to drop tests, cyclic loading, or temperatures above 80°C.
- End-use parts like hinges, clips, and brackets requiring isotropic properties in all orientations.
- Complex assemblies with internal channels where support removal would require 15+ hours of manual work.
- Outdoor applications exposed to UV radiation where photopolymer resin would degrade within 6 months.
Material Science: Thermoplastic Powder vs. Photopolymer Resin
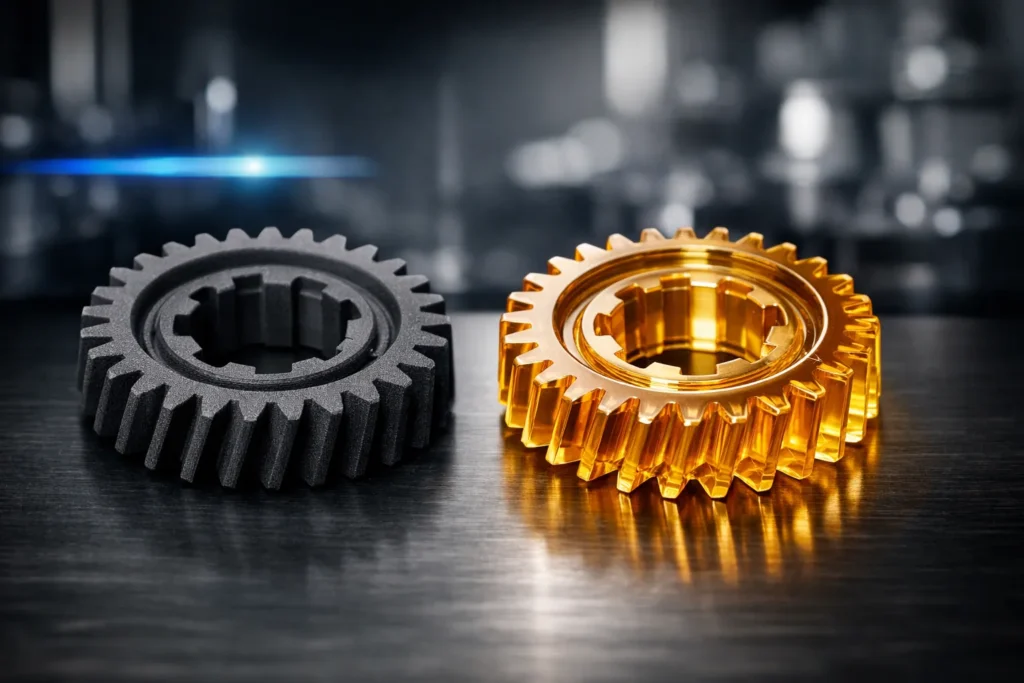
SLS fuses real thermoplastic powder through heat, creating molecular chains that bond identically in all directions. SLA cures liquid photopolymer resin with UV light, forming crosslinked polymer networks that remain brittle and anisotropic. The difference isn’t academic it determines whether your part survives a drop test or shatters on impact.
Thermoplastics like Nylon PA12 offer a glass transition temperature (Tg) of 178°C and consistent tensile strength across X, Y, and Z axes. Photopolymer resins deliver sub-50 micron resolution but degrade under UV exposure and exhibit 30-40% lower impact resistance along layer lines. Choose thermoplastics when parts must endure mechanical stress. Choose photopolymers when visual precision outweighs long-term durability.
SLS: Engineering-Grade Nylon, TPU, and Carbon-Filled Composites
SLS uses real thermoplastics, not simulated materials. Nylon PA12 and PA11 are the workhorses, offering 48-50 MPa tensile strength, chemical resistance to oils and solvents, and isotropic properties that match injection-molded parts. These materials don’t pretend to be engineering-grade, they are.
TPU enables flexible living hinges and gaskets that survive 100,000+ flex cycles without cracking. Carbon-filled composites add 20-30% stiffness for structural brackets and drone frames. Post-processing options like vapor smoothing reduce surface roughness to Ra 3-5 microns without sacrificing dimensional accuracy.
SLS materials tolerate continuous use at 80-100°C and resist UV degradation outdoors. You’re not buying a prototype material. You’re buying a production-ready thermoplastic that ships directly to end users.
SLA: High-Detail, Rigid, and Specialty Bio-Compatible Resins
SLA photopolymer resins excel at 15-50 micron layer resolution, delivering glass-smooth surfaces straight off the build plate. Standard resins offer 50-65 MPa tensile strength but remain brittle under impact. The crosslinked polymer network creates beautiful details but sacrifices the molecular flexibility thermoplastics provide.
Specialty resins simulate traditional materials ABS-like, PP-like, flexible but these are marketing approximations, not true equivalents. A “tough” resin may achieve 55 MPa tensile strength, but it still exhibits anisotropic failure along layer lines and degrades under 6 months of UV exposure.
Biocompatible resins meet FDA requirements for dental and surgical applications, making SLA the default choice for medical devices. Castable resins burn out cleanly for jewelry production. If your application demands visual fidelity and never faces mechanical abuse, photopolymer resins deliver unmatched precision at the cost of long-term durability.
The 2026 Sustainability Factor: Powder Recyclability vs. Resin Waste
SLS offers a 50-70% powder refresh rate, meaning you blend unused powder with virgin material for the next build. A typical build consumes 30% new powder and 70% recycled powder, reducing material waste dramatically. Nylon PA12 powder remains stable through 5-7 refresh cycles before degradation affects part quality.
SLA generates hazardous liquid waste uncured resin, IPA wash baths, and contaminated support material. You’ll dispose of 2-5 liters of chemical waste per build, requiring proper hazmat handling and increasing operational costs. Used resin cannot be recycled; it’s a single-use material that ends in specialty waste streams.
Powder recycling cuts material costs by 40-50% over time, while resin waste adds $200-$500/month in disposal fees for active production environments. If your organization tracks Scope 3 emissions or operates under ISO 14001 environmental standards, SLS delivers a measurable sustainability advantage. Resin-based workflows require documented waste management protocols that thermoplastic powder sidesteps entirely.
Mechanical Realities: How Parts Perform Under Stress
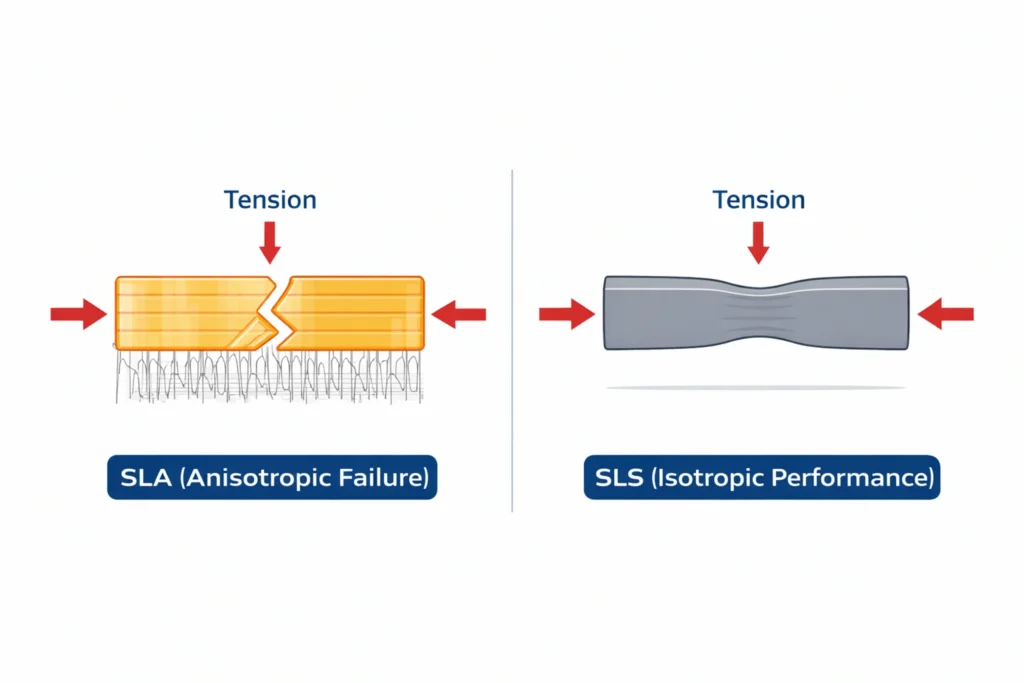
Your part doesn’t fail on the build plate. It fails during assembly, drop testing, or after 6 months in the field. SLS parts fracture predictably across grain boundaries because the material is homogeneous. SLA parts shatter along layer lines because UV-cured bonds between layers are 30-40% weaker than the cured resin itself.
Understand the physics of how each technology builds parts, and you’ll predict failure before it happens. Isotropic strength isn’t a feature it’s the difference between a functional prototype and a liability.
Isotropic vs. Anisotropic Strength: Why SLS Wins for Load-Bearing
SLS fuses thermoplastic powder particles in all directions simultaneously, creating molecular chains that distribute stress uniformly across X, Y, and Z axes. The result is isotropic properties a Nylon PA12 part exhibits 48-50 MPa tensile strength regardless of build orientation. You can design brackets, hinges, and clips without worrying about grain direction.
Warning: SLA parts exhibit 30-40% lower Z-axis strength due to layer adhesion. Photopolymer resin cures within each layer but relies on chemical bonding between layers to hold the part together. Those interlayer bonds never achieve the same strength as the cured resin itself, creating planes of weakness perpendicular to the build direction.
Load a vertical SLA part horizontally, and it snaps cleanly along layer lines at 20-25 MPa, half its rated tensile strength. Engineers who ignore build orientation during design create parts that pass initial testing but fail during real-world use. SLS eliminates this variable entirely, allowing you to orient parts for build volume optimization rather than structural integrity.
For functional prototypes subjected to impact, vibration, or cyclic loading, isotropic strength is non-negotiable. SLA works for static display models. SLS works for parts that must survive.
Environmental Stability: UV Degradation and Heat Deflection (HDT)
Photopolymer resins degrade under UV exposure, yellowing and becoming brittle within 6-12 months outdoors. The crosslinked polymer network breaks down when exposed to sunlight, reducing tensile strength by 15-25% and creating surface cracks. Parts intended for outdoor use require UV-resistant coatings that add cost and post-processing time.
Nylon PA12 remains stable under continuous UV exposure and tolerates operational temperatures up to 100°C without deformation. The material’s glass transition temperature (Tg) of 178°C means parts maintain dimensional accuracy in automotive underhood applications, industrial machinery, and outdoor enclosures.
Heat deflection temperature (HDT) matters when parts sit near motors, electronics, or direct sunlight. Standard SLA resins soften at 50-70°C, warping under loads that thermoplastics handle effortlessly. High-temp SLA resins push HDT to 238°C, but they sacrifice impact resistance and cost $300+/kg, double the price of Nylon PA12.
If your part faces temperature cycling, UV exposure, or sustained heat above 80°C, thermoplastic powder delivers predictable performance. Photopolymer resins require careful material selection and protective coatings to survive the same conditions.
Predictable Failure Modes: Creep, Brittleness, and Warping
Creep (SLA)
- Risk: Photopolymer resins deform under constant load over time, especially at temperatures above 40°C.
- Prevention: Avoid using SLA for spring-loaded assemblies, clamps, or parts under sustained tension. Redesign with reinforcement ribs if SLA is mandatory.
Brittleness (SLA)
- Risk: Parts shatter on impact due to anisotropic layer bonding and crosslinked polymer structure. Drop tests reveal 40% lower impact resistance than SLS.
- Prevention: Use “tough” or “durable” resins for functional prototypes, but expect 2-3x longer post-cure times and reduced dimensional accuracy.
Warping (SLS)
- Risk: Thin walls (<0.8mm) and large flat surfaces warp during cooldown if thermal gradients aren’t controlled.
- Prevention: Design with 1.2mm minimum wall thickness. Use ribbing and chamfers to manage stress distribution. Proper powder bed preheating eliminates 90% of warp issues.
Geometric Freedom and Design Constraints
SLA prints overhangs and bridges beautifully then punishes you with 40+ hours of support removal per build. SLS prints the same geometry with zero supports but demands 1.2mm minimum wall thickness to prevent warping. The real cost isn’t machine time. It’s the hidden labor you didn’t budget for when choosing technology based on part aesthetics alone.
The Support Structure Tax: Why SLA Costs More in Labor
Every SLA part with overhangs exceeding 45 degrees requires support structures that you’ll remove manually with flush cutters, then sand for 2-8 hours per build. Complex geometries, internal channels, undercuts, nested features generate dense support forests that contact finished surfaces and leave witness marks requiring 400-grit wet sanding to eliminate.
Calculate the true cost: a build with 15 parts takes 3 hours of print time but 12 hours of post-processing labor at $25/hour burdened rate. That’s $300 in labor for parts that cost $40 in resin. Engineers who ignore support removal labor discover their “cheap” SLA workflow costs more than outsourcing to SLS service bureaus.
IPA washing adds another 30-60 minutes per build, followed by UV post-cure for 15-30 minutes under controlled temperature. SLA doesn’t just require support it requires a multi-step finishing pipeline that SLS eliminates entirely.
Moving Parts and Nested Assemblies: The SLS Advantage
SLS parts sinter inside a self-supporting powder bed—the unfused powder acts as natural support material for overhangs, bridges, and internal voids. You can print fully assembled hinges, snap-fit enclosures, and gear trains in a single build with 0.3-0.5mm clearance between moving parts. The powder falls away during depowdering, leaving functional assemblies ready for testing.
Think of it as sintering parts in a cake, the powder holds everything in place during fusion, then releases cleanly without leaving witness marks or requiring cutting tools. A chain-link bracelet, ball-and-socket joint, or living hinge prints as one piece, eliminating assembly labor and adhesive bonding.
This advantage scales dramatically for complex assemblies. A 10-part enclosure with internal snap features requires zero support removal in SLS versus 20+ hours of manual labor in SLA. The geometric freedom isn’t theoretical, it’s a workflow multiplier that eliminates finishing bottlenecks and accelerates design iteration.
Minimum Feature Size and Wall Thickness Limitations
SLS Hard Limits:
- Minimum wall thickness: 1.2mm (thinner walls warp during cooldown)
- Minimum feature size: 0.8mm (finer details don’t fuse reliably)
- Clearance for moving parts: 0.3-0.5mm (powder grain size limits tight tolerances)
- Hole diameter accuracy: ±0.3mm (requires reaming for precision fits)
SLA Hard Limits:
- Minimum wall thickness: 0.5mm (supports enable thinner geometry)
- Minimum feature size: 0.3mm (laser spot size determines resolution)
- Clearance for moving parts: Not recommended (supports fuse nested components)
- Hole diameter accuracy: ±0.1mm (photopolymer shrinkage is predictable)
SLA wins for fine details and thin walls. SLS wins for functional assemblies that don’t need post-print surgery.
From Print Bed to Product: The Post-Processing Pipeline
SLA Workflow:
- Remove build plate and flush-cut supports for 2-8 hours depending on geometry complexity.
- Wash parts in IPA bath for 10-20 minutes, then dry completely to prevent surface defects.
- UV post-cure for 15-30 minutes at controlled temperature to achieve full mechanical properties.
- Sand witness marks with 400-grit wet paper, then finish with coating if UV resistance is required.
SLS Workflow:
- Depowder parts using compressed air and brushes for 2-4 hours per build.
- Bead blast surfaces to Ra 6-10 microns or vapor smooth to Ra 3-5 microns for cosmetic applications.
- Ship parts directly or apply dye for color customization without affecting dimensional accuracy.
Surface Finish Expectations: Injection-Mold Smooth vs. Matte Granular
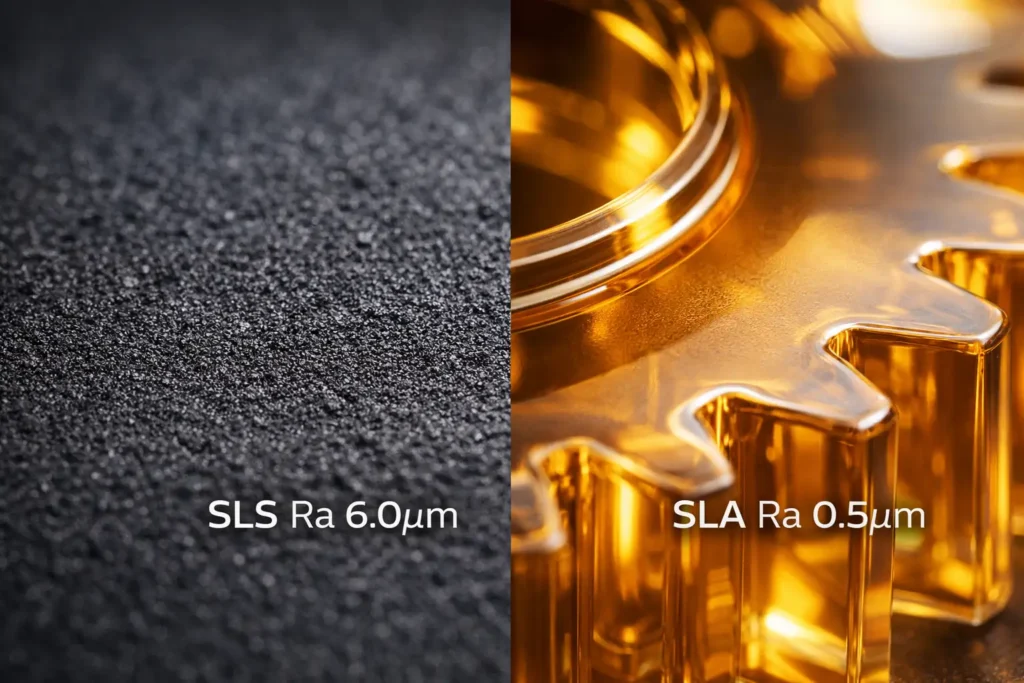
SLA delivers Ra 0.5-2 microns surface finish straight off the build plate—glossy, smooth, and visually indistinguishable from injection-molded parts. The photopolymer cures to a glass-like surface that requires zero sanding for aesthetic prototypes, consumer product mockups, or client-facing models.
SLS produces a matte, granular texture with Ra 6-10 microns due to sintered powder particles visible on the surface. Parts feel slightly rough to the touch and show visible layer lines under direct lighting. Standard bead blasting improves cosmetics but maintains the matte finish.
Vapor smoothing bridges the gap exposing Nylon PA12 parts to solvent vapor melts the outer 50-100 microns, reducing surface roughness to Ra 3-5 microns and creating a semi-gloss finish that approaches SLA quality. The process takes 30-60 minutes per batch and doesn’t compromise dimensional accuracy or mechanical properties.
Choose SLA when surface finish determines product success. Choose SLS when function outweighs aesthetics, then vapor smooth if clients demand visual refinement.
Dimensional Accuracy: Controlling Tolerances Across Large Batches
SLA achieves ±0.1-0.2mm dimensional accuracy over 100mm lengths due to predictable photopolymer shrinkage typically 2-4% during post-cure. You can compensate for this shrinkage in CAD by scaling geometry 102-104%, then verify dimensions after full cure. Batch consistency remains high because resin chemistry doesn’t drift between builds.
SLS delivers ±0.3-0.5mm accuracy due to thermal contraction during cooldown and powder density variations across the build volume. Parts printed near the center of the powder bed exhibit tighter tolerances than those at the edges, where temperature gradients cause 0.2-0.3mm additional warping on large geometries.
Control SLS tolerances by orienting critical dimensions along the Z-axis, using 1.2mm minimum wall thickness, and limiting flat surfaces larger than 100mm without ribbing. Powder refresh rate matters builds using 70%+ recycled powder show 15-20% higher dimensional variation than fresh powder builds.
For precision assemblies requiring ±0.1mm fits, SLA wins. For functional parts where ±0.5mm tolerances suffice and mechanical strength dominates, SLS delivers predictable accuracy across production runs.
Automated Post-Processing: Vapor Smoothing and UV Curing Stations
2026 automation eliminates the manual labor bottleneck. Automated vapor smoothing systems like Dyemansion and AMT process 50+ SLS parts in 30-60 minutes, reducing surface roughness to Ra 3-5 microns without hand finishing. These closed-loop systems recycle solvent vapor, cutting consumable costs by 60% compared to manual methods.
UV curing stations for SLA now feature 365nm LED arrays with real-time temperature monitoring, ensuring complete crosslinking without thermal warping. Automated wash-cure systems handle IPA washing, drying, and UV exposure in a single 45-minute cycle, removing the manual touch-labor that made SLA workflows expensive at scale.
Robotic depowdering cells use compressed air jets and vibration tables to recover 95% of unused SLS powder in 20 minutes per build, compared to 2-4 hours of manual brushing. The recovered powder feeds directly back into hoppers after sieving, maintaining the 50-70% refresh rate that makes SLS sustainable.
These systems cost $15,000-$50,000 but pay back in 6-12 months for shops running 3+ builds per week. The labor savings aren’t incremental they’re transformational.
The Economic Equation: Total Cost of Ownership (TCO)
Cost-per-part calculations mislead you. A $40 SLA part that requires 8 hours of labor costs $240 delivered. A $60 SLS part that needs 30 minutes of depowdering costs $72.50 delivered. Total cost of ownership accounts for machine depreciation, consumables, labor burden, and material waste not just resin prices on a spec sheet.
Run the numbers across 100 parts per month, and the economics flip dramatically. SLA’s labor tax compounds with volume. SLS’s powder recyclability creates economies of scale that make high-mix, low-volume production profitable. Calculate TCO honestly, or your “affordable” desktop printer bankrupts your operation.
Setup and Machine Depreciation: Desktop vs. Industrial Systems
SLA Desktop Systems (2026):
- Entry-level LCD printers: $300-$1,500 (Elegoo, Anycubic, Prusa)
- Professional laser SLA: $3,500-$15,000 (Formlabs Form 4, Nexa3D)
- Industrial large-format: $50,000-$150,000 (3D Systems, Stratasys)
SLS Industrial Systems (2026):
- Benchtop SLS: $18,000-$35,000 (Formlabs Fuse series, Sinterit)
- Mid-range production: $100,000-$250,000 (EOS P396, HP Multi Jet Fusion)
- High-volume industrial: $400,000-$800,000 (EOS P500, 3D Systems sPro)
Desktop SLA costs 10x less upfront but limits build volume to 192 x 120 x 200mm. Industrial SLS starts expensive but amortizes across 450 x 450 x 550mm build volumes, processing 50+ parts per run.
Labor Costs: Clean-up Time and Consumables Breakdown
SLA Consumables Per Month (50 parts):
- Photopolymer resin: $149-$300/kg × 2kg = $300-$600
- IPA wash solution: $40-$60 × 4 liters = $160-$240 (replaced every 30-40 parts)
- FEP film replacement: $25-$50 every 500 hours = $25/month
- Support removal labor: 6 hours × $25/hour = $150/build × 10 builds = $1,500
- UV post-cure electricity: $15-$30/month
Total SLA monthly cost: $2,150-$2,865
SLS Consumables Per Month (50 parts):
- Nylon PA12 powder: $80-$120/kg × 3kg (only 30% new powder due to recycling) = $72-$108
- Depowdering labor: 3 hours × $25/hour = $75/build × 5 builds = $375
- Bead blasting media: $30-$50/month
- Compressed air and utilities: $40-$60/month
Total SLS monthly cost: $517-$593
SLA’s IPA consumption and support removal labor cost 4-5x more than SLS at equivalent volumes. The consumables gap widens as production scales, SLS powder recycling delivers 40-50% material savings that SLA’s single-use resin can’t match.
Scaling the Volume: Where the Price-Per-Part Crosses Over

At 1-5 parts: SLA costs $35-$50 per part including labor. SLS costs $80-$120 due to powder waste and machine setup overhead. SLA wins for prototyping and one-offs.
At 20-30 parts: SLA costs $60-$85 per part as support removal labor compounds. SLS drops to $45-$65 per part as powder recycling kicks in and build volume optimization reduces waste. The crossover happens here.
At 50+ parts: SLA costs $70-$100 per part—labor doesn’t scale. SLS costs $30-$50 per part because 70% recycled powder and zero support removal create economies of scale. A full SLS build of 80 parts costs $2,400-$4,000 total versus $5,600-$8,000 for the same job in SLA.
The math changes further for complex geometries. An SLA part with 25 support contact points requires 45 minutes of cleanup labor $18.75 in labor alone. The identical SLS part needs 3 minutes of de-powdering, $1.25 in labor. Multiply that across production runs, and SLS becomes 50-60% cheaper at volume despite higher machine costs.
Desktop SLA makes sense for <10 parts/month. Industrial SLS pays for itself at >40 parts/month when labor burden and material waste are factored honestly.
Industry-Specific Applications in 2026
Engineers don’t choose SLS vs SLA in a vacuum, they choose based on industry requirements, regulatory constraints, and end-use performance. Aerospace demands isotropic strength and temperature resistance above 100°C. Medical requires biocompatible resins and patient-specific geometries. Consumer electronics prioritizes visual fidelity and sub-50 micron surface finish for client approvals. Match the technology to the application’s critical failure mode, not generic capability charts.
Aerospace and Automotive (Functional Prototypes and Jigs)
Aerospace tooling, automotive underhood components, and vibration-test fixtures require Nylon PA12CF carbon-fiber-filled SLS powder delivering 20-30% higher stiffness than standard PA12. These parts endure 10,000+ cycle fatigue testing, continuous exposure to 120°C engine bay temperatures, and chemical contact with oils, coolants, and hydraulic fluids.
SLS jigs and fixtures replace aluminum tooling at 60% lower cost and 80% faster lead times. A brake caliper test fixture weighing 850g in aluminum costs $1,200 machined versus $320 printed in PA12CF with identical load-bearing performance. Custom assembly jigs for wiring harnesses print as single-piece nested assemblies, eliminating 15+ hours of manual fixture assembly and alignment.
Medical and Dental (Patient-Specific Guides and Models)
Surgical guides, dental aligners, and anatomical models require biocompatible clear resins with FDA 510(k) clearance and ISO 10993 certification. SLA dominates this space because 15-50 micron resolution captures CT scan data accurately, and transparent materials allow surgeons to visualize internal anatomy during pre-operative planning.
Dental labs produce 200+ aligners per day using SLA workflows optimized for throughput each build plate holds 30-40 aligner models that print in 4-6 hours, then move directly to thermoforming without post-processing. Patient-specific surgical guides for orthopedic implants require ±0.1mm dimensional accuracy to match bone geometry scanned at 0.3mm slice thickness.
SLS plays no role here biocompatible Nylon powders lack FDA clearance for tissue contact, and the Ra 6-10 micron surface finish doesn’t meet Class II medical device requirements.
Consumer Electronics (Visual Prototypes and Small-Batch Enclosures)
Industrial designers validating form factor, ergonomics, and brand aesthetics rely on SLA’s glass-smooth finish for client presentations and focus group testing. A smartphone case prototype with 0.6mm wall thickness and sub-millimeter speaker grilles prints cleanly in SLA but warps in SLS due to thermal stress on thin geometry.
Enclosures for IoT devices, wearables, and smart home products require Class A surface finish with zero visible layer lines under showroom lighting. SLA delivers this out of the box; SLS requires vapor smoothing and additional finishing to approach the same quality.
Small-batch production runs of 50-200 units favor SLA when visual perfection outweighs durability concerns. A Kickstarter product demo or trade show display model uses SLA. The production enclosure that ships to customers uses injection molding SLS fills the gap for functional prototypes that survive drop testing.
Final Checklist: 5 Questions to Ask Before You Hit “Print”
1. Will this part endure mechanical stress or environmental exposure?
If it faces impact, vibration, UV exposure, or temperatures above 80°C, choose SLS. If it’s a static display model or aesthetic prototype, SLA works.
2. How many hours of post-processing labor can your team absorb?
Calculate support removal time honestly. An SLA build with 20 parts requiring 8 hours of cleanup costs $200 in labor at $25/hour burdened rate. SLS needs 30 minutes of de-powdering.
3. Does your geometry include internal channels, nested assemblies, or moving parts?
SLS prints fully assembled mechanisms in one build. SLA requires support structures that fuse nested components together, destroying functionality.
4. What’s your monthly part volume, and does it justify machine investment?
Below 10 parts/month, desktop SLA wins on upfront cost. Above 40 parts/month, SLS pays for itself through powder recycling and eliminated labor.
5. Are you designing for prototyping or production?
SLA validates form and aesthetics. SLS validates function and durability. If your part ships to customers or enters field testing, choose the technology that survives real-world use.
FAQs
Is SLS stronger than SLA 3D printing?
Yes. SLS (Selective Laser Sintering) is significantly stronger for functional use because it produces isotropic parts with uniform strength in all directions (X, Y, and Z). While SLA (Stereolithography) offers higher tensile strength in the XY plane, its Z-axis layer adhesion is 30–40% weaker, making it prone to brittle failure under mechanical stress.
What is the cost difference between SLS and SLA?
SLA has a lower upfront cost, with professional desktop units starting at $3,750, whereas benchtop SLS systems begin around $18,000. However, for production volumes exceeding 25 parts, SLS is cheaper due to its 70% powder recyclability and the elimination of manual support removal labor, which can cost $200+ per build in an SLA workflow.
Does SLA require more post-processing than SLS?
Yes. SLA requires significantly more manual labor because every part requires support structures that must be clipped and sanded by hand, often taking 2–8 hours per build. SLS is self-supporting in a powder bed; post-processing is limited to automated depowdering and bead blasting, which typically takes less than 30 minutes of active human labor.
Can SLS parts be used for end-use production?
Yes. SLS is a primary choice for low-to-mid volume end-use production because it utilizes real thermoplastics like Nylon PA11 and PA12. Unlike SLA resins, which are light-sensitive and become brittle over time, SLS materials are environmentally stable, UV-resistant, and maintain mechanical integrity for years in the field.
Usama is the founder of PlasticSpec and a materials researcher specialising in engineering thermoplastics. He publishes machining parameters, material property data, and selection guides for Delrin, Nylon, PEEK, PTFE, UHMW, Polycarbonate, and ABS.