DTF Size Chart: Exact Print Sizes, Placement Rules & Scaling Guide
| Garment Type & Size | Print Location | Recommended Size (Width Range) | Notes/Tips |
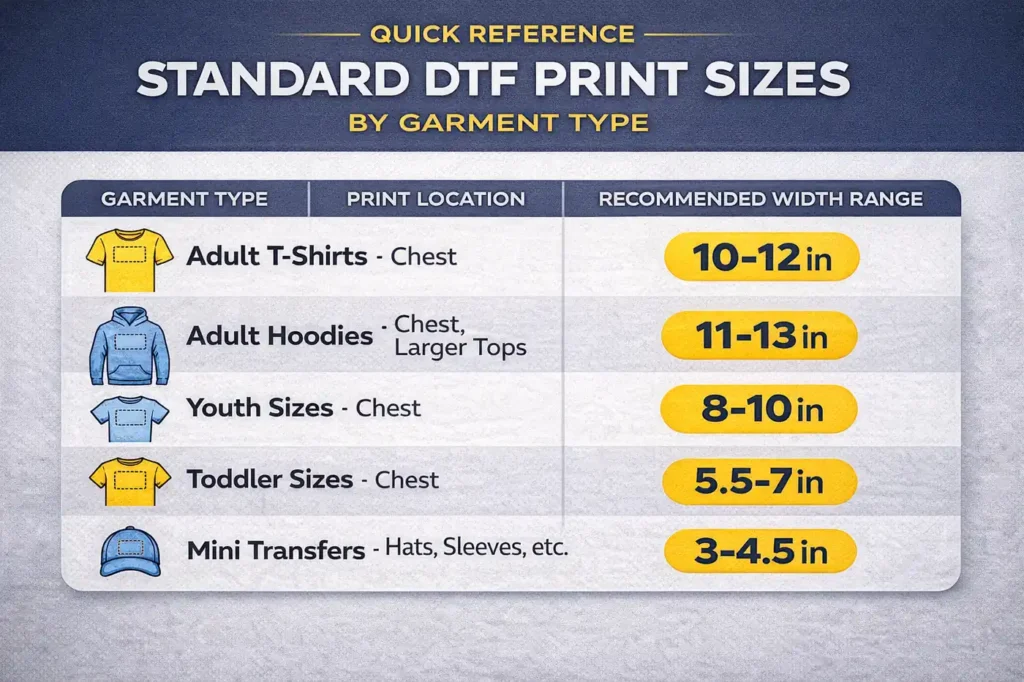
| Adult T-Shirts | Left Chest | 3.5–4.5 in (9–11.5 cm) | Standard for most adult sizes. |
| Small/Minimal Front | 8–9 in (20–23 cm) | Suitable for subtle designs. | |
| Standard Front | 10–12 in (25–30.5 cm) | Industry baseline for most S-XL. | |
| Oversize Front | 12.5–14 in (32–35.5 cm) | Only recommended for heavyweight tees (avoid side seams). | |
| Full Back | 11–14 in (28–35.5 cm) | Place ~3-4 inches below the collar seam. | |
| Hoodies/Sweats | Standard Front | 11–12.5 in (28–32 cm) | Keep print 0.5″ higher than on tees to clear pocket seam. |
| Full Back | 12–14.5 in (30.5–37 cm) | Provides maximum visibility. | |
| Youth Apparel | Youth Front | 8–10 in (20–25.5 cm) | Use with youth S-XL garments. |
| Toddler Apparel | Toddler Front | 5–7 in (12.5–18 cm) | For smaller infant/toddler sizes (2T-4T+). |
| Infant Apparel | Infant Front | 4–6 in (10–15 cm) | For onesies and very small apparel. |
| Mini Transfers | Sleeve Logo | 2.5–4 in (6.5–10 cm) | Ideal for branding on the upper sleeve/shoulder area. |
| Neck Tag/Label | 2–2.75 in (5–7 cm) | Used for internal branding/care labels. |
This DTF size chart provides the exact print dimensions you need for t-shirts, hoodies, youth apparel, pocket logos, and neck tags, eliminating the guesswork of custom printing.
By the end of this guide, you’ll have the production-safe measurements for every garment type, every time.
Tips for Success
- Measure First: Always measure the specific garment’s printable area (from collar to pocket top, or between seams) before finalizing the design size.
- Avoid Seams: Printing over thick seams, zippers, or ribbing can cause poor adhesion, cracking, and a distorted appearance. Stay within the flat press zone.
- Prioritize Width: If your artwork is unusually shaped, size it primarily by width, then adjust the height proportionally to ensure it fits the garment width without looking squished or overhanging.
DTF Placement Guidelines That Affect Final Appearance
The correct size still looks wrong if the placement is inconsistent. Treat placement as a measurable production spec, not “by eye,” especially when running multiple garment sizes on the same artwork.
Chest Placement Standards (Distance From Collar)
Measure from the collar seam to the top edge of the print. Use 2.5–3 in (6.5–7.5 cm) for adult tees and hoodies, and 2–2.5 in (5–6.5 cm) for youth.
This placement keeps the design in the stable upper chest press zone, avoids throat-level installs, and prevents the artwork from dropping into the belly area once the garment is worn.
It also maintains consistent spacing across different sizes.
The “4-Finger Rule” & Horizontal Alignment
After you set your measured drop, use a quick physical check:
Stack 3–4 fingers from the collar seam down to where the top of the print begins. This method works on press floors because it’s fast, repeatable, and doesn’t require a ruler every time, especially during high-volume runs.
Then confirm horizontal alignment using a center fold or laser line, not the collar tag. Aim for a tolerance of ±0.25 in (±6 mm); perfect symmetry isn’t realistic across mass-produced blanks.
How Fabric Type Changes Ideal DTF Sizing
Your transfer can be dimensionally correct and still fail visually if the fabric moves differently under heat and wear.
Fabric choice affects how much the print, “spreads” how the garment settles on the body, and whether edges stay sharp after wash cycles.
100% Cotton vs Polyester (Shrink & Stretch Behavior)
Cotton can shrink after the first wash, tightening the visual spacing around the print. If the blank isn’t pre-shrunk, reduce standard front width by 0.25–0.5 in (6–13 mm) to keep clearance from seams and maintain chest balance.
Polyester is more dimensionally stable, but it reacts to heat, and surface rippling can show through large prints. Keep wide designs inside flat press zones to avoid distortion.
Performance Fabrics & Stretch Blends
Stretch blends expand across the chest and recover after wear, so prints placed on high-tension zones can warp, crack, or look smaller in-use.
Oversized graphics fail faster because more area flexes with every movement, especially near side panels, rib inserts, and armhole curves.
Keep the width conservative, prioritize the center press zone, and avoid thin details that sit across stretch seams or contour stitching.
Dark Garments & Dye Migration Considerations
On dark garments, especially poly blends, larger prints require a heavier white under base to block the dye and maintain color density.
That extra under base increases film coverage, which creates a stiffer hand-feel and makes the print more noticeable during wear.
At that point, sizing becomes a comfort decision, not just a visual one.
For most dark tops, keep large fronts below 12.5 in (32 cm) unless the fabric is heavyweight and stable.
Technical Specifications for High-Quality Scaling
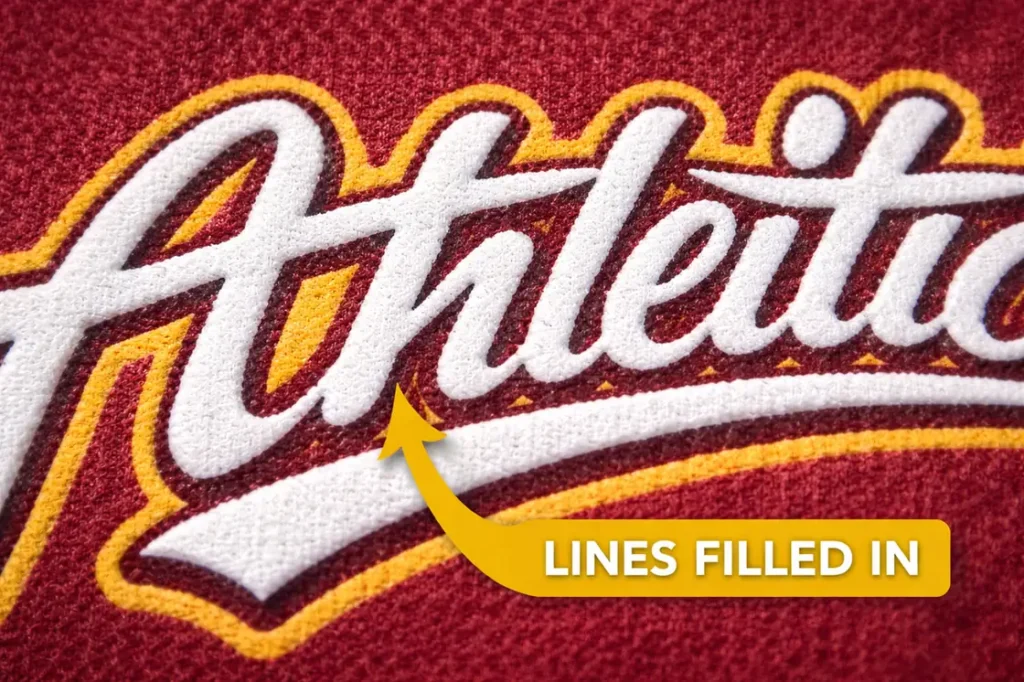
Sizing is only half the job. If the file isn’t built to scale cleanly, the transfer prints soft, thin strokes disappear, and small text fills in after powder + melt.
Lock your technical specs before you resize, especially when the same design runs across multiple garment sizes.
Pixel-to-Inch Conversion Table (300 DPI Standard)
Use 300 DPI as the default because it delivers clean edges, stable gradients, and readable microtext after powder + cure.
It also gives you enough pixel density to resize down without losing definition.
Use these targets:
- 3 in = 900 px
- 4 in = 1200 px
- 5 in = 1500 px
- 8 in = 2400 px
- 10 in = 3000 px
- 12 in = 3600 px
- 14 in = 4200 px
Avoid “auto-scale to fit” in RIP or design software. It can stretch artwork non-uniformly, soften edges, and push small text below printable thresholds.
Set final dimensions manually, then export at the correct pixel size so the print profile behaves predictably.
Minimum Line Weight & Text Size Limits
Set your minimum line weight to 0.02 in (0.5 mm) for reliable output across different powders, cure profiles, and press settings.
Anything thinner can break during peeling, fill in after melting, or disappear once the garment stretches. For text, keep small type above 6 pt (ideal 8 pt+) and maintain negative-space gaps of at least 0.016 in (0.4 mm).
Below these limits, you’ll see merging, rough edges, lost counters, and early cracking in high-flex zones.
DTF Film & Production Constraints That Limit Size Choices
Your ideal transfer dimensions still have to fit real production limits: film width, platen size, cure space, and how efficiently you build gang sheets.
If you ignore these constraints, you increase waste, slow down throughput, and risk edge lift on oversized prints.
Maximum Print Area by Film Width
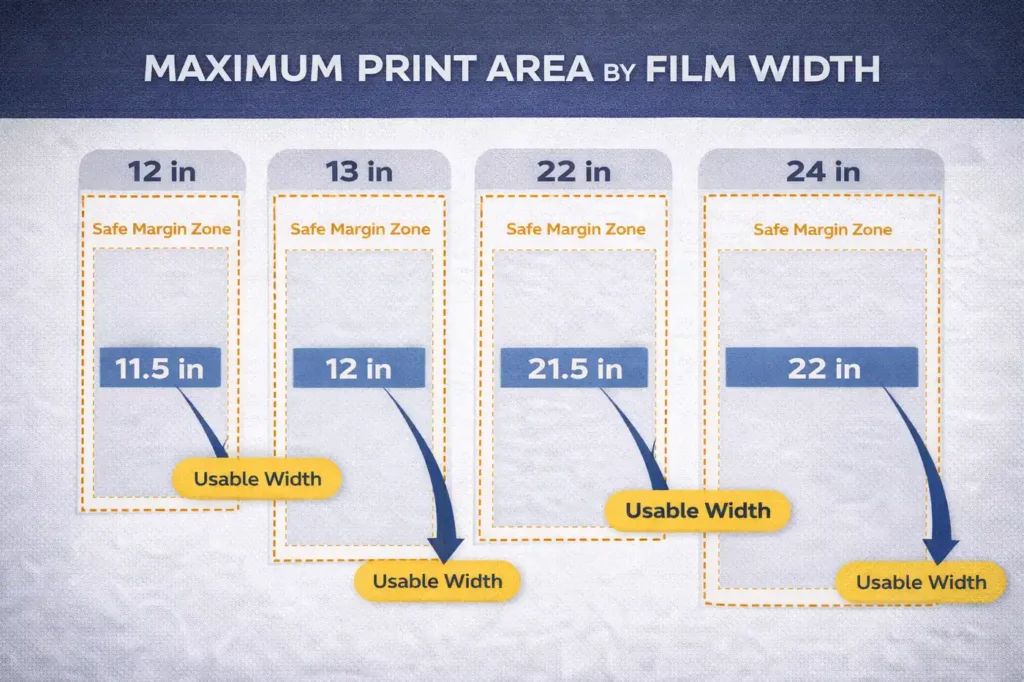
Film width sets a hard ceiling on transfer dimensions. With A3 sheets, your usable print area is typically 11.3 × 16.5 in (28.7 × 42 cm), and the real-world safe space is smaller once you leave trim margins.
Roll systems are limited by 12 in, 13 in, 22 in, or 24 in widths, and the press platen can still cap the final size. If the artwork exceeds the stable press zone, you’ll fight edge lift and uneven bonding.
Maximizing Gang Sheets Without Quality Loss
Gang sheets reduce cost only when the layout stays cut-friendly and cure-consistent.
Group transfers by similar size and ink coverage, so one section doesn’t over-cure while another stays under-melted.
Leave at least 0.25 in (6 mm) between designs for automated cutting, and 0.4 in (10 mm) for manual trimming.
Don’t over-stuff the sheet; tight spacing increases powder bridges, edge contamination, and mis-cuts.
A slightly smaller layout that peels cleanly is cheaper than reprints.
Common DTF Sizing Mistakes That Ruin Prints
Oversized Prints on Lightweight Garments
Mistake: pushing 12.5–14 in (32–35.5 cm) fronts onto thin tees.
It happens because the design looks balanced on-screen but ignores fabric drape and chest width.
Consequence: the print plates across the torso feel heavy and crack faster because the shirt flexes more than the film can recover.
Ignoring Stretch Zones & Seam Placement
Mistake: sizing into side seams, pocket seams, rib panels, or underarm curves. It happens when you center by eye and don’t map the press zone first.
Consequence: edges lift, distortion shows after pressing, and seam lines telegraph through the transfer, especially on hoodies and performance blanks.
Scaling Designs Without Adjusting Resolution
Mistake: resizing artwork without rebuilding the file at the correct pixel density. It happens when shops rely on RIP auto-scaling or stretch a low-res PNG.
Consequence: soft edges, filled-in text, and jagged curves, then the print fails QC because it looks “blurry” even when the press settings are correct.
Final Recommendation: How to Choose the Right DTF Size Every Time
Choose transfer dimensions based on the press zone first, then scale artwork to fit that zone, not the other way around.
Start with the standard size range for the garment category, confirm collar drop and center alignment, and check seam clearance before you commit.
Then lock file specs at 300 DPI, keep details above minimum line and text limits, and adjust only when fabric behavior (shrink, stretch, underbase stiffness) changes the outcome.
Treat sizing as a repeatable process: measure, place, scale, verify.
That’s how you eliminate reprints and keep results consistent across every blank.
Key Takeaways (Read Before Printing)
- Size by press zone, then scale the artwork to fit; never force a design into seams or curves.
- Use 10–12 in (25–30.5 cm) as the standard adult front and adjust only when the blank width changes.
- Set collar drop to 2.5–3 in (6.5–7.5 cm) on adults and 2–2.5 in (5–6.5 cm) on youth for consistent placement.
- Build files at 300 DPI and export at the correct pixel size avoid RIP auto-scaling.
- Keep line weight above 0.02 in (0.5 mm) and small text above 6 pt to prevent fill-in and breaks.
- On dark poly blends, keep large fronts below 12.5 in (32 cm) to control stiffness and comfort.
FAQs
What is the most common DTF size for t-shirts?
The most common front print size for adult tees is 10–12 in (25–30.5 cm) wide. It fits the standard chest press zone on most blanks without pushing into side seams or underarm curves.
What pixel size should I use for DTF printing?
At 300 DPI, use 3000 px for a 10 in wide print, 3600 px for 12 in, and 4200 px for 14 in. Export at the final pixel size instead of resizing during printing to keep edges sharp.
Can I use the same DTF size for all shirt sizes?
Not reliably. One size can work across S–XL for many designs, but you should resize when the print approaches seams, looks oversized on lightweight blanks, or becomes too small to read on larger garments.
Does DTF size change for polyester or performance fabrics?
Yes. Polyester and stretch blends are more sensitive to heat, behavior, and tension. Wide prints near curved zones show distortion sooner, and dark poly blends often require heavier underbase coverage—so large prints become a comfort and flexibility decision.
What size DTF for 2XL+ Shirt?
- Standard front: 12 × 16 inches (30 × 40 cm)
- Large / full front: 13–14 inches wide × 16–18 inches tall
- Left chest: 4–5 inches wide
- Back print: 12–14 inches wide × up to 18 inches tall
Best practice: For 2XL and larger shirts, increase width first to maintain proper proportions. Avoid designs under 11 inches wide, as they look small on larger garments.